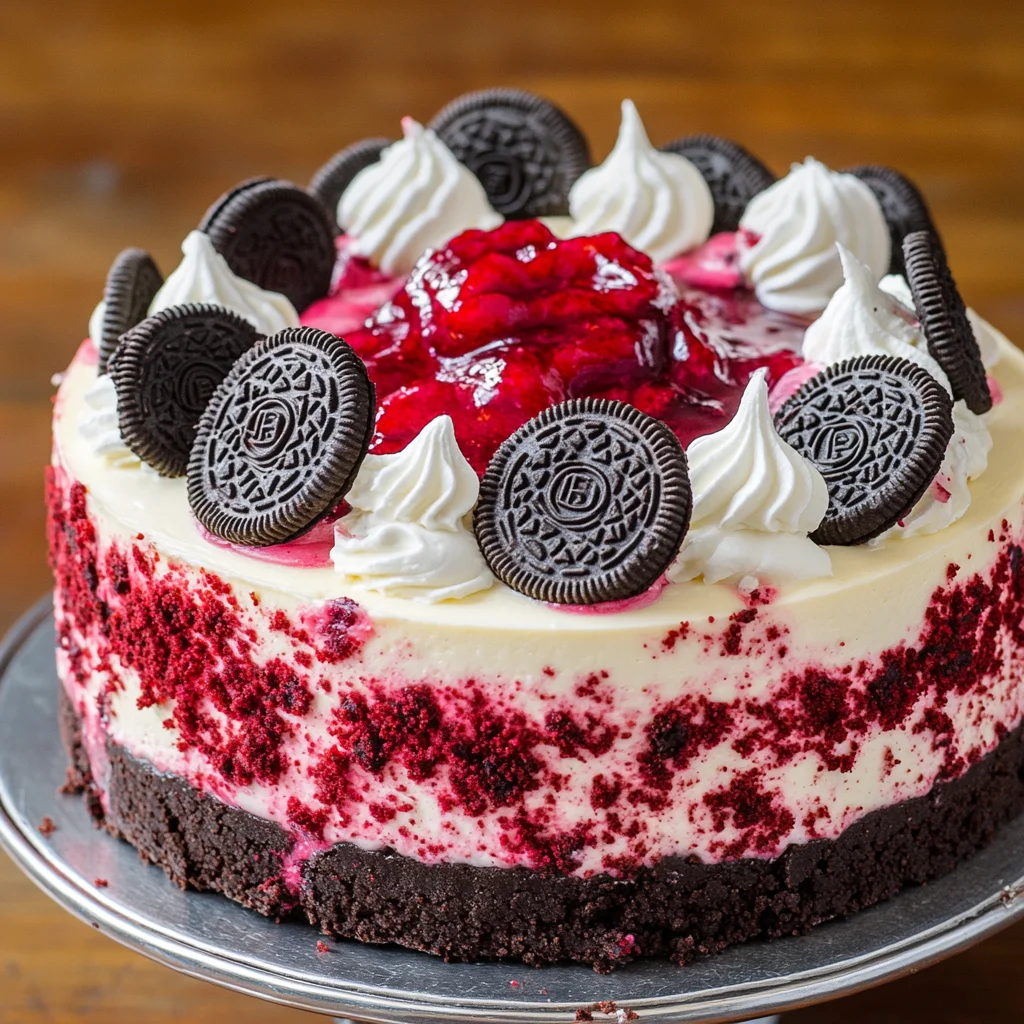
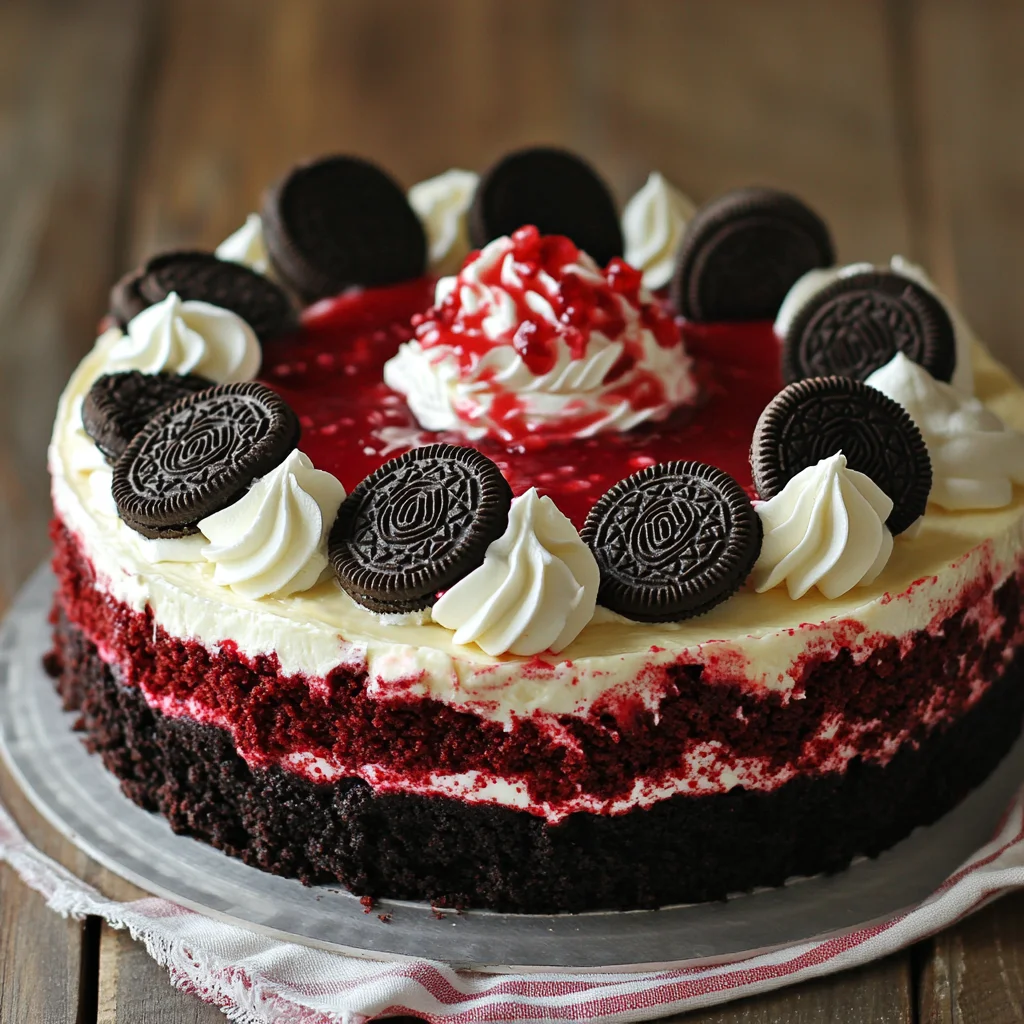
Introduction to Red Velvet Oreo Cheesecake
As a busy mom, I know how precious time can be, especially when it comes to whipping up something special in the kitchen. That’s why I absolutely adore this Red Velvet Oreo Cheesecake! It’s a delightful blend of rich flavors that’s sure to impress your loved ones without taking hours to prepare. Whether it’s a birthday celebration or just a sweet treat after dinner, this cheesecake is the perfect solution. With its creamy texture and vibrant color, it’s not just a dessert; it’s a moment of joy that you can savor together.
Why You’ll Love This Red Velvet Oreo Cheesecake
This Red Velvet Oreo Cheesecake is a game-changer for busy days. It’s incredibly easy to make, requiring minimal effort while delivering maximum flavor. The combination of creamy cheesecake and the crunch of Oreo cookies creates a delightful texture that’s hard to resist. Plus, it’s a showstopper at any gathering, making you the star of the dessert table. Trust me, your family will be asking for seconds!
Ingredients for Red Velvet Oreo Cheesecake
Gathering the right ingredients is the first step to creating this luscious Red Velvet Oreo Cheesecake. Here’s what you’ll need:
- Oreo cookies: These classic cookies form the base of our cheesecake crust. Their chocolatey flavor pairs perfectly with the red velvet.
- Unsalted butter: Melted butter helps bind the Oreo crumbs together, creating a rich and sturdy crust.
- Cream cheese: The star of the filling! Softened cream cheese gives the cheesecake its creamy texture and tangy flavor.
- Granulated sugar: This sweetens the filling, balancing the richness of the cream cheese.
- Vanilla extract: A splash of vanilla adds warmth and depth to the flavor profile.
- Heavy whipping cream: Chilled heavy cream is whipped to create a light and airy texture in the filling.
- Red velvet cake crumbs: These crumbs add that signature red velvet flavor and color, making the cheesecake visually stunning.
- Berry compote: A topping of raspberry or strawberry compote adds a fruity contrast to the rich cheesecake.
- Whipped cream: For garnish, whipped cream adds a light touch and makes the dessert even more inviting.
For exact measurements, check the bottom of the article where you can find everything listed for easy printing. Feel free to get creative with your ingredients! You can swap out the berry compote for your favorite fruit topping or even try a different cookie for the crust. The possibilities are endless!
How to Make Red Velvet Oreo Cheesecake
Step 1: Preheat and Prepare
First things first, let’s get that oven preheating to 350°F (175°C). While it warms up, grab a 9-inch springform pan and line the bottom with parchment paper. This little trick ensures your cheesecake comes out smoothly later. Trust me, there’s nothing worse than a stuck cheesecake! Once the oven is ready, you’ll be all set to create a delicious crust that will hold all that creamy goodness.
Step 2: Make the Crust
Now, let’s dive into making the crust! Take those Oreo cookies and crush them into fine crumbs. You can use a food processor or just place them in a zip-top bag and smash away with a rolling pin. Mix the crumbs with melted unsalted butter until it resembles wet sand. Press this mixture firmly into the bottom of your prepared pan. Bake it for 8-10 minutes, then let it cool completely. This crust is the perfect foundation for your Red Velvet Oreo Cheesecake!
Step 3: Prepare the Filling
With the crust cooling, it’s time to whip up the filling! In a large mixing bowl, beat the softened cream cheese and granulated sugar together until smooth and creamy. Add in a splash of vanilla extract for that extra flavor boost. This step is crucial; you want a silky texture that will melt in your mouth. Make sure there are no lumps, as they can ruin the cheesecake experience. Your filling is almost ready!
Step 4: Fold in the Cream
Next, let’s add some lightness to our filling. Take your chilled heavy whipping cream and whip it until soft peaks form. Gently fold this whipped cream into the cream cheese mixture. This is where the magic happens! If you want a firmer cheesecake, dissolve 1 teaspoon of gelatin in 2 tablespoons of water and fold it in as well. This will help your cheesecake hold its shape beautifully. You’re on the right track!
Step 5: Add Red Velvet Cake Crumbs
Now, it’s time to bring in the star of the show: the red velvet cake crumbs! Gently mix in the red velvet cake crumbs until they’re evenly distributed throughout the filling. This not only adds flavor but also gives your cheesecake that stunning red hue. Make sure to fold carefully so you don’t deflate the whipped cream. You want a light and airy filling that’s bursting with red velvet goodness!
Step 6: Assemble and Refrigerate
Pour the luscious filling over your cooled crust, spreading it evenly with a spatula. This is where the cheesecake starts to take shape! Once it’s all smoothed out, cover the pan with plastic wrap and pop it in the refrigerator. Let it chill for at least 6 hours, or even better, overnight. This waiting game is tough, but it’s worth it for that perfect set. Your patience will be rewarded!
Step 7: Decorate and Serve
Finally, the moment you’ve been waiting for! Once your cheesecake is set, it’s time to add the finishing touches. Spread a layer of raspberry or strawberry compote on top for a fruity contrast. Then, decorate with dollops of whipped cream and extra Oreo cookies for that wow factor. Slice it up, serve chilled, and watch as everyone’s eyes light up. Enjoy every bite of this delightful Red Velvet Oreo Cheesecake!
Tips for Success
- Always use room temperature cream cheese for a smooth filling.
- Chill your heavy whipping cream for better whipping results.
- Don’t rush the refrigeration; letting it set overnight enhances the flavor.
- For a fun twist, try adding chocolate chips to the filling.
- Use a hot knife to slice the cheesecake for clean edges.
Equipment Needed
- 9-inch springform pan: Essential for easy removal; a regular cake pan works too, but slicing will be trickier.
- Mixing bowls: Use a large bowl for the filling and a smaller one for whipping cream.
- Electric mixer: A hand mixer is perfect; a whisk works if you’re feeling adventurous!
- Spatula: A silicone spatula helps in folding and spreading the filling smoothly.
- Food processor or rolling pin: For crushing Oreos; a zip-top bag and a heavy object can do the trick too!
Variations
- Gluten-Free: Substitute regular Oreo cookies with gluten-free Oreos to make this cheesecake suitable for gluten-sensitive friends.
- Chocolate Lovers: Add cocoa powder to the filling for an extra chocolatey twist, or use chocolate Oreos for the crust.
- Fruit-Infused: Mix in fresh berries or a fruit puree into the filling for a burst of flavor and color.
- Nutty Crunch: Incorporate crushed nuts, like pecans or walnuts, into the crust for added texture and flavor.
- Vegan Option: Use vegan cream cheese and coconut cream in place of heavy whipping cream for a plant-based version.
Serving Suggestions
- Pair your Red Velvet Oreo Cheesecake with a scoop of vanilla ice cream for a delightful contrast.
- Serve alongside a fresh fruit salad to balance the richness of the cheesecake.
- For drinks, consider a chilled glass of sweet iced tea or a rich coffee.
- Presentation tip: Use a cake stand to elevate your cheesecake and add a touch of elegance.
FAQs about Red Velvet Oreo Cheesecake
Can I make Red Velvet Oreo Cheesecake ahead of time?
Absolutely! In fact, making it a day in advance allows the flavors to meld beautifully. Just keep it covered in the refrigerator until you’re ready to serve.
What can I use instead of heavy whipping cream?
If you’re looking for a lighter option, you can use whipped topping or even Greek yogurt. Just keep in mind that the texture may differ slightly.
How do I store leftovers?
Store any leftover cheesecake in an airtight container in the refrigerator. It should stay fresh for about 3-4 days, but I doubt it will last that long!
Can I freeze Red Velvet Oreo Cheesecake?
Yes, you can freeze it! Just wrap individual slices tightly in plastic wrap and then place them in a freezer-safe container. Thaw in the fridge before serving.
What’s the best way to slice the cheesecake?
For clean slices, dip a sharp knife in hot water, wipe it dry, and then cut through the cheesecake. This method helps prevent sticking and keeps those beautiful layers intact!
Final Thoughts
Creating this Red Velvet Oreo Cheesecake is more than just baking; it’s about crafting a moment of joy for you and your loved ones. The vibrant colors and rich flavors come together to create a dessert that’s not only delicious but also visually stunning. Each slice is a celebration, perfect for any occasion, big or small. I hope this recipe brings as much happiness to your kitchen as it has to mine. So, gather your family, slice up that cheesecake, and enjoy the sweet moments together. Trust me, it’s a treat you won’t forget!
Print
Red Velvet Oreo Cheesecake: A Delightful Treat to Savor!
- Total Time: 6 hours 40 minutes
- Yield: 8 servings 1x
- Diet: Vegetarian
Description
A rich and creamy Red Velvet Oreo Cheesecake that combines the flavors of red velvet cake and Oreo cookies, perfect for any occasion.
Ingredients
- 24 Oreo cookies (plus extra for decoration)
- 5 tbsp unsalted butter (melted)
- 16 oz cream cheese (softened)
- 3/4 cup granulated sugar
- 1 tsp vanilla extract
- 1 cup heavy whipping cream (chilled)
- 1 cup red velvet cake crumbs
- 1/4 cup raspberry or strawberry compote (for topping)
- Whipped cream (for garnish)
Instructions
- Preheat your oven to 350°F (175°C). Line the bottom of a 9-inch springform pan with parchment paper.
- Crush the Oreos into fine crumbs and mix them with the melted butter. Press the mixture firmly into the bottom of the prepared pan to create the crust. Bake for 8-10 minutes, then set aside to cool completely.
- In a large mixing bowl, beat the softened cream cheese and granulated sugar until smooth. Mix in the vanilla extract.
- Gradually fold in the heavy whipping cream until the filling is light and creamy. For a firmer set, dissolve 1 tsp of gelatin in 2 tbsp water and fold it into the filling.
- Gently mix in the red velvet cake crumbs until evenly distributed.
- Pour the filling over the cooled crust, spreading it evenly with a spatula. Cover and refrigerate for at least 6 hours or overnight to set.
- Once set, spread the berry compote on top of the cheesecake. Decorate with whipped cream and extra Oreo cookies.
- Serve chilled and enjoy!
Notes
- For best results, use room temperature cream cheese to avoid lumps.
- Make sure the heavy whipping cream is chilled for better whipping.
- Feel free to use any berry compote of your choice for topping.
- Prep Time: 30 minutes
- Cook Time: 10 minutes
- Category: Dessert
- Method: Baking and Refrigeration
- Cuisine: American
Nutrition
- Serving Size: 1 slice
- Calories: 450
- Sugar: 30g
- Sodium: 300mg
- Fat: 30g
- Saturated Fat: 15g
- Unsaturated Fat: 10g
- Trans Fat: 0g
- Carbohydrates: 40g
- Fiber: 2g
- Protein: 6g
- Cholesterol: 80mg
Keywords: Red Velvet Oreo Cheesecake, cheesecake recipe, dessert, red velvet, Oreo