Introduction to Peanut Butter Truffles Recipe
Peanut Butter Truffles Recipe. These little bites of heaven are not just a treat; they are a celebration of flavors that dance on your taste buds. The creamy peanut butter filling, combined with a luscious chocolate coating, creates a perfect harmony that is hard to resist.
Let me take you back to the first time I made these truffles. It was a chilly afternoon, and I was craving something sweet. I rummaged through my pantry and found a jar of peanut butter, some chocolate, and a sprinkle of creativity. With a few simple ingredients, I transformed my kitchen into a mini confectionery. The aroma of melting chocolate filled the air, and soon enough, I had a tray of glistening truffles waiting to be devoured.
What I love most about this recipe is its simplicity. You don’t need to be a professional chef to whip these up. In fact, I often involve my kids in the process. They love rolling the truffles into balls and, of course, sneaking a few bites along the way! It’s a fun activity that brings us together, and the end result is always a hit at family gatherings.
Whether you’re looking for a quick dessert to impress guests or a sweet treat to enjoy on a cozy night in, these peanut butter truffles are the answer. They are versatile, too! You can customize them with different toppings or even experiment with flavors. So, grab your apron, and let’s dive into this delicious adventure together!
Ingredients for Peanut Butter Truffles Recipe

Peanut Butter Truffles, let’s gather our ingredients. Having everything ready makes the process smoother and more enjoyable. Here’s what you’ll need:
Main Ingredients
- 1 cup creamy peanut butter: I prefer using natural peanut butter without added sugars or oils. It gives a rich flavor and a smooth texture.
- 4 tablespoons unsalted butter, softened: This adds creaminess to the filling. Make sure it’s at room temperature for easy mixing.
- 1/2 teaspoon vanilla extract: A splash of vanilla enhances the flavor, making the truffles even more irresistible.
- 1 1/2 cups powdered sugar: This sweetens the filling and helps it hold together. Sift it if you want a super smooth texture.
Optional Add-ons
- 8 oz semi-sweet or dark chocolate, chopped: Choose your favorite chocolate for coating. Dark chocolate adds a nice contrast to the sweetness.
- 1 teaspoon coconut oil or vegetable shortening: This is optional but helps create a smoother chocolate coating.
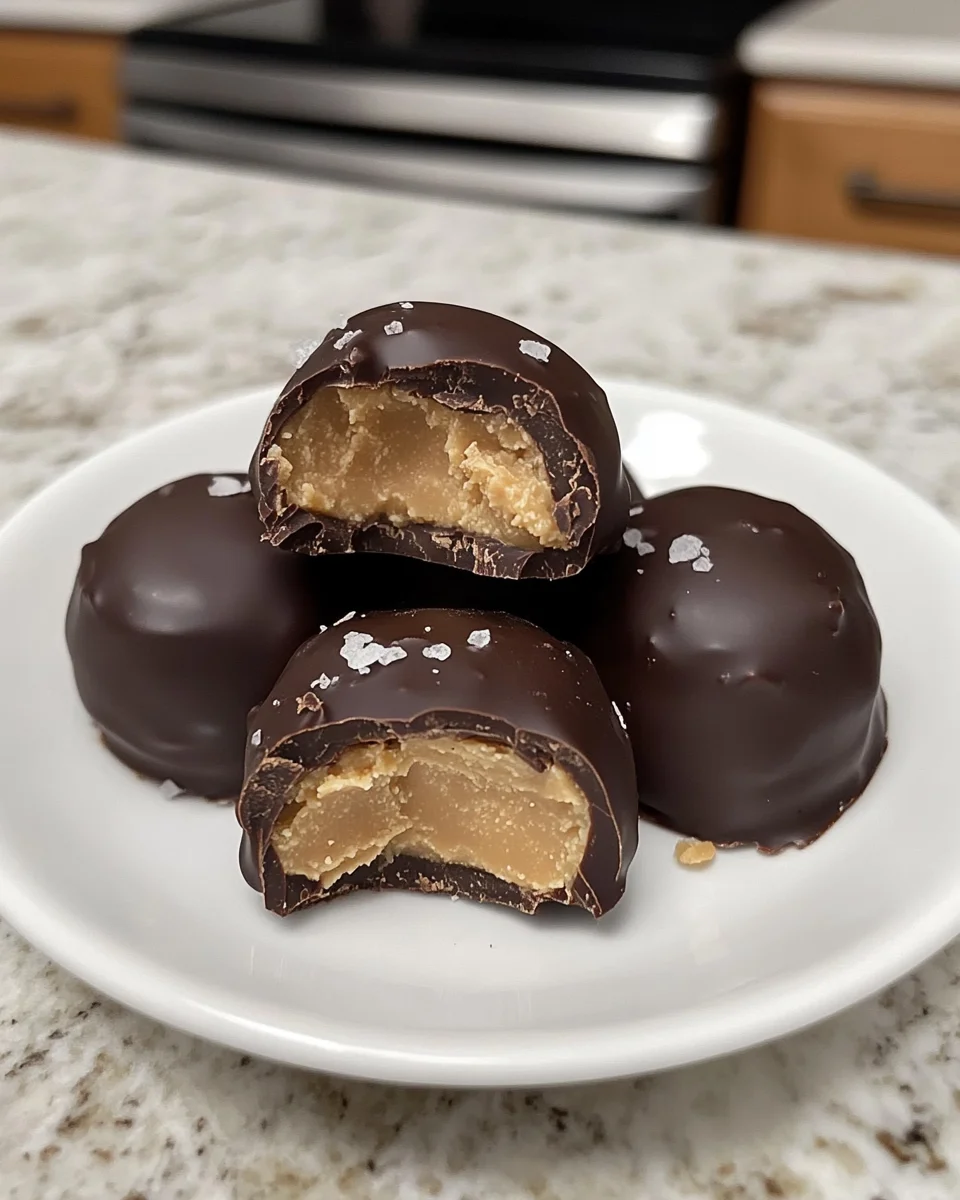
- 1/4 cup crushed peanuts: For a crunchy topping, sprinkle these on top of the chocolate before it sets.
- Drizzle of melted white chocolate: This adds a beautiful touch and a hint of sweetness.
- Sea salt flakes: A sprinkle of sea salt elevates the flavor, balancing the sweetness perfectly.
When selecting your ingredients, I always recommend going for high-quality products. The better the ingredients, the tastier your truffles will be! Now that we have everything ready, let’s move on to the fun part—preparing these delicious treats!
How to Prepare Peanut Butter Truffles Recipe
Peanut Butter Truffles is a delightful process that fills your kitchen with sweet aromas and happy vibes. Let’s break it down step by step.
Step 1: Mixing the Peanut Butter Base
First things first, we need to create that creamy, dreamy filling. In a large mixing bowl, I start by beating together the creamy peanut butter, softened butter, and vanilla extract. I use a hand mixer for this, but a sturdy whisk works just as well if you’re feeling adventurous. The goal is to achieve a smooth and velvety mixture that makes your heart sing!
Tips for Achieving the Right Consistency
- Make sure your butter is softened to room temperature. This helps it blend seamlessly with the peanut butter.
- Don’t rush the mixing! Take your time to ensure everything is well combined.
- If the mixture feels too thick, you can add a splash of milk to loosen it up a bit.
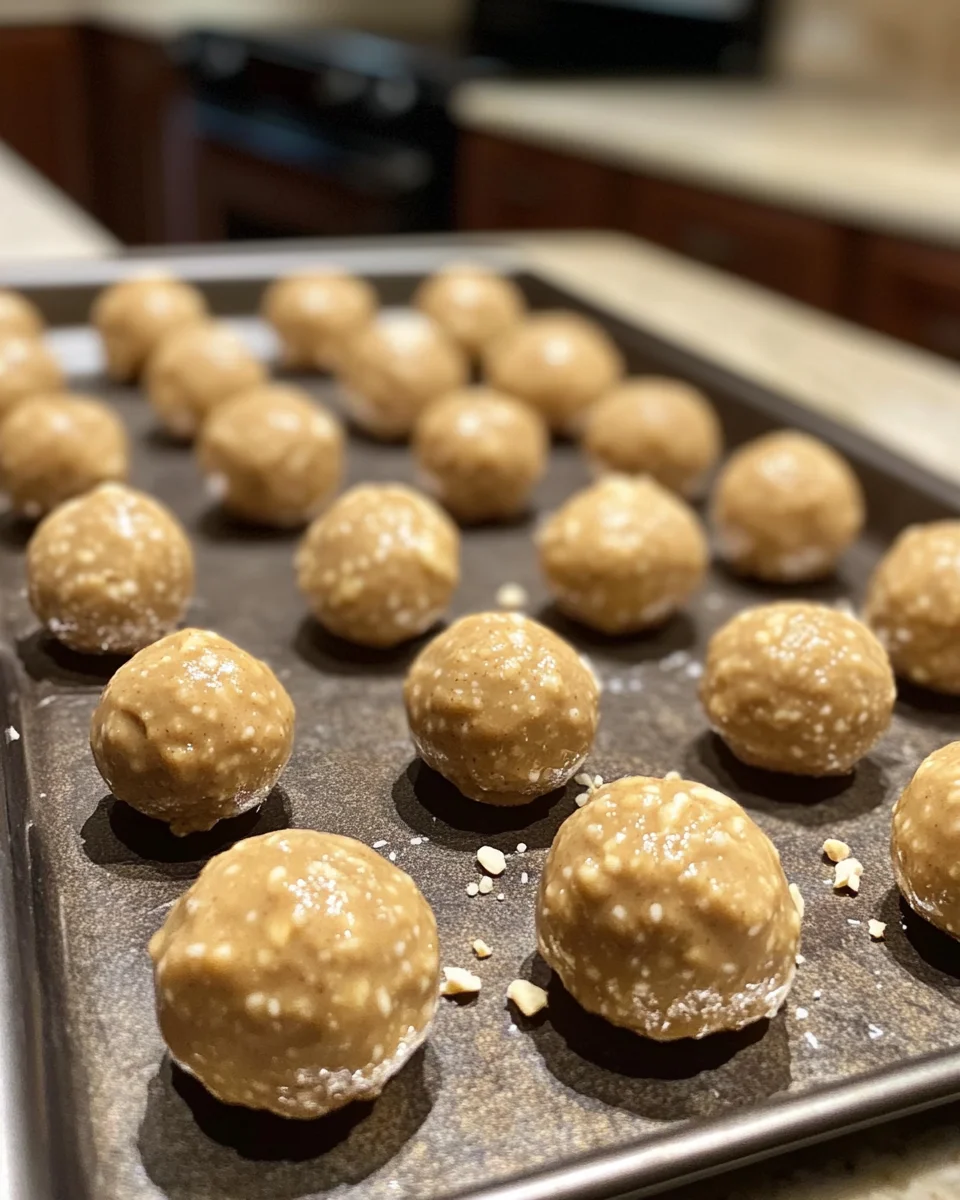
Step 2: Forming the Truffles
Once your filling is ready, it’s time to shape it into delightful little balls. I like to use a small cookie scoop for this, as it helps me get even-sized truffles. Roll the mixture into 1-inch balls and place them on a parchment-lined tray. It’s like crafting tiny edible treasures!
Tips for Shaping Perfect Balls
- Wet your hands slightly to prevent the mixture from sticking to your palms.
- Try to make them as uniform as possible for even coating later on.
- If you have any leftover filling, don’t worry! Just roll it into a ball and enjoy it as a snack.
Step 3: Chilling the Truffles
Now comes the waiting game. Pop the tray of truffles into the freezer for about 30 minutes. This step is crucial because it helps the truffles firm up, making them easier to coat in chocolate later. I often use this time to clean up my kitchen or sneak a few bites of leftover filling!
Importance of Chilling Time
- Chilling helps the truffles hold their shape when dipped in chocolate.
- It also enhances the flavors, making each bite even more delicious.
Step 4: Coating the Truffles
Once the truffles are nice and firm, it’s time for the fun part—coating them in chocolate! In a microwave-safe bowl, I melt the chopped chocolate and coconut oil together in 30-second intervals, stirring until smooth. The coconut oil gives the chocolate a lovely sheen and makes it easier to work with.
Tips for Even Coating
- Use a fork or toothpick to dip each truffle into the melted chocolate. This helps you get an even coat.
- Let the excess chocolate drip off before placing them back on the tray.
- Work quickly, as the chocolate can start to set if it cools down too much.
And there you have it! With these steps, you’ll create a batch of peanut butter truffles that are sure to impress. The process is simple, but the results are nothing short of magical. Now, let’s gather our tools and get ready to make these delicious treats!
How to Prepare Peanut Butter Truffles Recipe
Peanut Butter Truffles is a delightful process that fills your kitchen with sweet aromas and happy vibes. Let’s break it down step by step.
Step 1: Mixing the Peanut Butter Base
First things first, we need to create that creamy, dreamy filling. In a large mixing bowl, I start by beating together the creamy peanut butter, softened butter, and vanilla extract. I use a hand mixer for this, but a sturdy whisk works just as well if you’re feeling adventurous. The goal is to achieve a smooth and velvety mixture that makes your heart sing!
Tips for Achieving the Right Consistency
- Make sure your butter is softened to room temperature. This helps it blend seamlessly with the peanut butter.
- Don’t rush the mixing! Take your time to ensure everything is well combined.
- If the mixture feels too thick, you can add a splash of milk to loosen it up a bit.
Step 2: Forming the Truffles
Once your filling is ready, it’s time to shape it into delightful little balls. I like to use a small cookie scoop for this, as it helps me get even-sized truffles. Roll the mixture into 1-inch balls and place them on a parchment-lined tray. It’s like crafting tiny edible treasures!
Tips for Shaping Perfect Balls
- Wet your hands slightly to prevent the mixture from sticking to your palms.
- Try to make them as uniform as possible for even coating later on.
- If you have any leftover filling, don’t worry! Just roll it into a ball and enjoy it as a snack.
Step 3: Chilling the Truffles
Now comes the waiting game. Pop the tray of truffles into the freezer for about 30 minutes. This step is crucial because it helps the truffles firm up, making them easier to coat in chocolate later. I often use this time to clean up my kitchen or sneak a few bites of leftover filling!
Importance of Chilling Time
- Chilling helps the truffles hold their shape when dipped in chocolate.
- It also enhances the flavors, making each bite even more delicious.
Step 4: Coating the Truffles
Once the truffles are nice and firm, it’s time for the fun part—coating them in chocolate! In a microwave-safe bowl, I melt the chopped chocolate and coconut oil together in 30-second intervals, stirring until smooth. The coconut oil gives the chocolate a lovely sheen and makes it easier to work with.
Tips for Even Coating
- Use a fork or toothpick to dip each truffle into the melted chocolate. This helps you get an even coat.
- Let the excess chocolate drip off before placing them back on the tray.
- Work quickly, as the chocolate can start to set if it cools down too much.
And there you have it! With these steps, you’ll create a batch of peanut butter truffles that are sure to impress. The process is simple, but the results are nothing short of magical. Now, let’s gather our tools and get ready to make these delicious treats!
Equipment Needed for Peanut Butter Truffles Recipe
Peanut Butter Truffles, let’s gather the essential tools that will make our cooking experience smooth and enjoyable. Here’s what you’ll need:
- Mixing Bowl: A large mixing bowl is essential for combining the peanut butter filling. If you don’t have one, any sturdy bowl will do!
- Hand Mixer or Whisk: A hand mixer makes blending the ingredients a breeze, but a whisk works just as well if you’re up for a little workout.
- Cookie Scoop: This handy tool helps you form even-sized truffles. If you don’t have one, you can use your hands or a tablespoon to scoop the mixture.
- Parchment Paper: Line your tray with parchment paper to prevent the truffles from sticking. If you’re out of parchment, a silicone baking mat is a great alternative.
- Microwave-Safe Bowl: You’ll need this for melting the chocolate. If you prefer, you can also use a double boiler on the stove.
- Fork or Toothpick: These are perfect for dipping the truffles into the melted chocolate. If you don’t have either, a skewer can work in a pinch!
With these tools at your side, you’re all set to create your delicious peanut butter truffles. Remember, the joy of cooking comes not just from the ingredients but also from the tools that help you bring your culinary dreams to life!
Variations of Peanut Butter Truffles Recipe
Peanut Butter Truffles is how versatile they are! You can easily switch things up to suit your taste or to impress your friends. Here are a few fun variations that I’ve tried and loved:
- Chocolate Chip Peanut Butter Truffles: Mix in mini chocolate chips into the peanut butter filling for an extra chocolatey surprise in every bite.
- Nutty Coconut Truffles: Add shredded coconut to the filling or roll the finished truffles in coconut flakes for a tropical twist.
- Spicy Peanut Butter Truffles: For a kick, mix in a pinch of cayenne pepper or chili powder into the peanut butter filling. It’s a surprising flavor that works beautifully!
- Almond Joy Truffles: Incorporate chopped almonds and a hint of almond extract into the filling, then coat with dark chocolate for a nutty delight.
- Matcha Peanut Butter Truffles: For a unique flavor, mix in matcha powder into the chocolate coating. It adds a beautiful green hue and a subtle earthy taste.
These variations not only keep things exciting but also allow you to express your creativity in the kitchen. So, don’t hesitate to experiment and find your favorite twist on these delightful truffles!
Cooking Notes for Peanut Butter Truffles Recipe
Peanut Butter Truffles, I’ve gathered a few cooking notes that can help you achieve the best results. These little tips can make a big difference in your truffle-making adventure!
- Room Temperature Ingredients: Always ensure your butter is softened and your peanut butter is at room temperature. This helps create a smooth filling that blends beautifully.
- Quality Chocolate: The chocolate you choose for coating can elevate your truffles. Opt for high-quality chocolate for a richer flavor and smoother finish.
- Chill Time is Key: Don’t skip the chilling step! It’s essential for the truffles to hold their shape during coating and enhances the overall flavor.
- Experiment with Toppings: Feel free to get creative with your garnishes! Crushed nuts, sprinkles, or even a dusting of cocoa powder can add a fun twist.
- Storage Tips: Store your truffles in an airtight container in the fridge. They can last up to two weeks, but I bet they won’t last that long!
With these cooking notes in mind, you’re well on your way to creating a batch of peanut butter truffles that will impress everyone. Happy cooking!
Serving Suggestions for Peanut Butter Truffles Recipe

Peanut Butter Truffles, the possibilities are as endless as my love for these sweet bites! Here are a few delightful ways to present them that will surely impress your family and friends:
- On a Dessert Platter: Arrange the truffles on a beautiful platter, mixing in some fresh fruit like strawberries or banana slices for a pop of color. It creates an inviting display that’s perfect for gatherings.
- Gift Boxes: Package the truffles in cute little boxes or jars tied with a ribbon. They make for thoughtful homemade gifts for birthdays, holidays, or just because!
- With Coffee or Tea: Serve these truffles alongside a warm cup of coffee or tea. The rich flavors of the truffles pair wonderfully with a hot beverage, making for a cozy treat.
- As a Party Favor: If you’re hosting a party, consider placing a few truffles in small bags as party favors. Your guests will appreciate the sweet gesture!
- On a Dessert Table: If you’re having a dessert buffet, these truffles can be a star attraction. They’re easy to grab and enjoy, making them a hit among guests.
Whichever way you choose to serve them, these peanut butter truffles are sure to be a crowd-pleaser. Enjoy the smiles they bring!
Tips for Perfecting Your Peanut Butter Truffles Recipe
Peanut Butter Truffles, I’ve picked up a few golden tips that can elevate your truffle-making game. These little nuggets of wisdom will help you create truffles that are not only delicious but also visually stunning!
- Use Quality Ingredients: The flavor of your truffles starts with the ingredients. Opt for high-quality peanut butter and chocolate for the best taste.
- Chill Thoroughly: Don’t rush the chilling process! A well-chilled filling makes for easier shaping and coating, ensuring your truffles hold their form.
- Experiment with Flavors: Don’t be afraid to mix things up! Adding spices, extracts, or even different nut butters can create exciting new flavors.
- Perfect Your Coating Technique: When dipping, ensure the chocolate is warm but not too hot. This prevents the truffles from melting and helps achieve a smooth finish.
- Presentation Matters: Take a moment to garnish your truffles with crushed nuts or a drizzle of chocolate. A little extra effort goes a long way in making them look irresistible!
With these tips in your back pocket, you’re ready to create peanut butter truffles that will wow your family and friends. Happy truffle-making!
Breakdown of Time for Peanut Butter Truffles Recipe
Peanut Butter Truffles, knowing how much time to set aside can help you plan your sweet adventure. Here’s a quick breakdown of the time involved:
- Prep Time: 15 minutes – This includes gathering your ingredients and mixing the peanut butter filling.
- Chilling Time: 30 minutes – Allow the truffles to firm up in the freezer, making them easier to coat.
- Coating Time: 15 minutes – Melting the chocolate and dipping the truffles takes just a bit of time.
- Total Time: 1 hour – In just an hour, you can create a batch of these delightful treats!
With this time breakdown, you can easily fit truffle-making into your day. Whether it’s a cozy afternoon or a fun family activity, you’ll have delicious peanut butter truffles ready to enjoy in no time!
Nutritional Information for Peanut Butter Truffles Recipe
As a passionate home cook, I always find it helpful to know the nutritional content of the treats I make, especially when sharing them with family and friends. Here’s a quick overview of the nutritional information for one peanut butter truffle, based on the recipe provided:
- Calories: Approximately 100 calories
- Protein: 2.5 grams
- Fat: 6 grams
- Carbohydrates: 10 grams
- Sugar: 6 grams
- Fiber: 0.5 grams
Keep in mind that these values can vary based on the specific ingredients you use, especially the type of chocolate and peanut butter. If you’re looking to make these truffles a bit healthier, consider using dark chocolate or reducing the amount of powdered sugar. Regardless, these little bites of joy are a delightful treat that can fit into a balanced diet when enjoyed in moderation!
Frequently Asked Questions about Peanut Butter Truffles Recipe
Peanut Butter Truffles, I often get questions from fellow home cooks eager to try their hand at this delightful treat. Here are some of the most common questions I’ve encountered, along with my answers to help you on your truffle-making journey!
Can I use crunchy peanut butter instead of creamy?
Absolutely! Using crunchy peanut butter adds a delightful texture to your truffles. Just keep in mind that the truffles may be a bit less smooth, but they’ll still be delicious!
How do I store leftover truffles?
Store your peanut butter truffles in an airtight container in the fridge. They can last up to two weeks. If you want to keep them longer, you can freeze them for up to three months. Just make sure to separate layers with parchment paper to prevent sticking.
Can I make these truffles vegan?
Yes! To make vegan peanut butter truffles, use a plant-based butter substitute and dairy-free chocolate. There are many great options available that will work perfectly in this recipe.
What can I use instead of coconut oil?
If you don’t have coconut oil, vegetable shortening is a great alternative. It helps create a smooth chocolate coating. You can also skip it altogether, but the chocolate may not be as glossy.
Can I add flavors to the chocolate coating?
Definitely! You can mix in a few drops of peppermint extract, orange zest, or even a sprinkle of espresso powder to the melted chocolate for a fun twist. Just be careful not to add too much liquid, as it can affect the chocolate’s consistency.
What if my chocolate coating is too thick?
If your chocolate coating is too thick, you can add a little more coconut oil or shortening to thin it out. Just melt it again gently and stir until you achieve the desired consistency.
These FAQs should help clear up any uncertainties you might have about making your own peanut butter truffles. Remember, the joy of cooking comes from experimenting and having fun in the kitchen. So, don’t hesitate to ask more questions or share your own tips as you embark on this sweet adventure!
Conclusion on Peanut Butter Truffles Recipe
Peanut Butter Truffles is not just about creating a delicious treat; it’s about the joy of cooking and sharing sweet moments with loved ones. These truffles are a perfect blend of creamy peanut butter and rich chocolate, making them a delightful indulgence for any occasion. Whether you’re hosting a gathering, looking for a fun family activity, or simply craving something sweet, these truffles are sure to impress.
What I love most is their versatility. You can customize them with various toppings and flavors, making each batch uniquely yours. Plus, they’re easy to prepare, allowing even novice cooks to shine in the kitchen. So, gather your ingredients, roll up your sleeves, and embark on this delightful culinary adventure. I promise you won’t regret it! Enjoy every bite of your homemade peanut butter truffles!