Introduction to Baklava Cheesecake Recipe
As a passionate home cook, I often find myself on a delightful culinary adventure, exploring the rich tapestry of flavors that different cultures offer. One day, while reminiscing about my travels through the Mediterranean, I stumbled upon the idea of combining two of my favorite desserts: baklava and cheesecake. The thought of a Baklava Cheesecake sent my taste buds into a frenzy! Imagine the flaky, buttery layers of phyllo pastry mingling with the creamy, luscious filling of cheesecake, all topped with a sweet, sticky honey syrup and crunchy pistachios. It was a match made in dessert heaven!
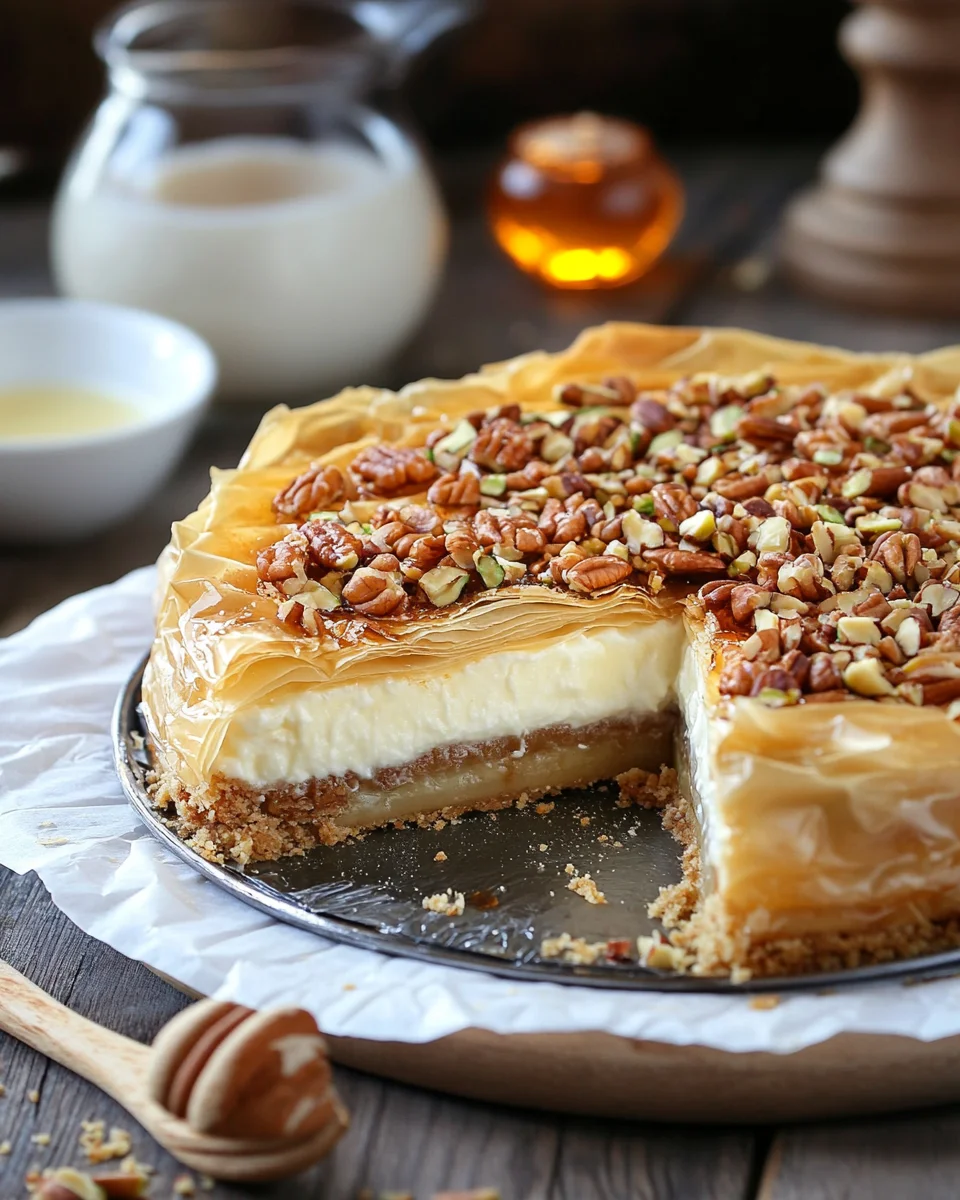
This Baklava Cheesecake Recipe is not just a treat for the eyes; it’s a celebration of textures and flavors. The crispy phyllo base provides a delightful crunch, while the cheesecake filling is smooth and rich, creating a perfect balance. I remember the first time I made this dessert for a family gathering. The moment I pulled it out of the oven, the aroma of warm honey and toasted nuts filled the air, drawing everyone into the kitchen. It was a hit! Each slice was met with oohs and aahs, and I couldn’t help but feel a sense of pride as I watched my loved ones savor every bite.
Whether you’re looking to impress guests at a dinner party or simply want to indulge in a sweet treat at home, this Baklava Cheesecake Recipe is sure to become a favorite. It’s a delightful fusion that brings together the best of both worlds, and I can’t wait to share it with you. So, let’s roll up our sleeves and dive into this delicious adventure together!
Ingredients for Baklava Cheesecake Recipe

Before we embark on this delicious journey, let’s gather all the ingredients we’ll need for our Baklava Cheesecake Recipe. I always believe that the quality of ingredients can make or break a dish, so I recommend using the freshest and finest products you can find. Trust me, it makes a world of difference!
Main Ingredients
- 10 sheets of phyllo pastry (thawed) – Look for high-quality phyllo; it should be thin and delicate.
- Approx. 2 sticks unsalted butter, melted – Unsalted butter allows you to control the saltiness of the dish.
- 1 cup roasted walnuts – I love to toast my walnuts lightly to enhance their flavor.
- 1 cup roasted almonds – Feel free to use slivered almonds for a different texture.
- 1 tsp. ground cinnamon – This spice adds warmth and depth to the cheesecake.
- 1/4 tsp. salt – Just a pinch to balance the sweetness.
- 2 Tbsp. melted butter (for phyllo base) – This will help the layers crisp up beautifully.
- 500gr. (2 pkges) cream cheese, room temperature – Make sure it’s softened for a smooth filling.
- 1 cup granulated sugar – Sweetness is key in this dessert!
- Pinch of salt – Again, just a touch to enhance the flavors.
- 2 tsp. vanilla extract – Pure vanilla extract is always best for that rich flavor.
- 1 Tbsp. lemon zest – This adds a refreshing brightness to the cheesecake.
- 1 Tbsp. lemon juice – A little acidity helps balance the richness.
- 1 Tbsp. corn starch – This will help stabilize the filling.
- 3 large eggs, room temp. – Room temperature eggs mix in more smoothly.
- 250 gr. strained Greek yogurt (or sour cream) – I prefer Greek yogurt for its tangy flavor and creaminess.
Optional Add-ons
- 1 cup shelled pistachios (unsalted), coarsely chopped – These add a lovely crunch and vibrant color.
- 1 cup honey – Use a good quality honey for the best flavor.
- 1 Tbsp. lemon juice – For the honey syrup, this adds a nice zing.
- A splash of rosewater – If you want to elevate the flavor profile, this is a delightful addition.
Gathering these ingredients is the first step to creating a masterpiece. I can already smell the sweet aroma wafting through my kitchen! Now that we have everything ready, let’s move on to the next exciting part: preparing our Baklava Cheesecake!
How to Prepare Baklava Cheesecake Recipe
Now that we have all our ingredients ready, it’s time to roll up our sleeves and dive into the fun part: preparing our Baklava Cheesecake! I love this stage because it’s where the magic happens. Each step brings us closer to that delicious slice of heaven. Let’s get started!
Step 1: Prepare the Crust
First things first, we need to create that delightful phyllo crust. Preheat your oven to 350°F (175°C) if you haven’t already. Grab your springform pan and line the base with trimmed parchment paper. This will help with easy removal later on.
Brush your first sheet of phyllo with melted butter and place it in the pan. Repeat this process with the remaining sheets, layering them one on top of the other. Don’t worry if they don’t look perfect; the beauty of phyllo is in its rustic charm! Once you’ve layered all 10 sheets, trim any overhanging edges and press the phyllo into the base of the pan. Pop it in the oven for about 12 minutes, or until it’s just golden.
Tips for Step 1
- Keep the phyllo sheets covered with a damp cloth while you work to prevent them from drying out.
- Don’t rush the buttering process; it’s what gives the crust that flaky texture!
Step 2: Make the Cheesecake Filling
While the crust is baking, let’s whip up the cheesecake filling! In a mixing bowl, combine the cream cheese, sugar, salt, vanilla extract, lemon zest, lemon juice, and corn starch. Using a hand mixer or stand mixer, beat the mixture for about 4-5 minutes until it’s smooth and creamy. I love to scrape down the sides of the bowl with a spatula to ensure everything is well combined.
Next, add the eggs one at a time, mixing well after each addition. Finally, fold in the strained Greek yogurt. This step adds a lovely tanginess to the filling that pairs beautifully with the sweetness of the honey topping.
Tips for Step 2
- Make sure your cream cheese is at room temperature for a lump-free filling.
- Don’t overmix once you add the eggs; just mix until combined to avoid a dense cheesecake.
Step 3: Layer the Baklava Topping
Once your crust is baked and cooled slightly, it’s time to add the nutty layer! In a food processor, pulse together the roasted walnuts, roasted almonds, cinnamon, and salt until crumbly. Then, mix in the melted butter until everything is well combined. Spread this nut mixture evenly over the phyllo crust, pressing it down gently.
Tips for Step 3
- Feel free to experiment with different nuts; pecans or hazelnuts can add a unique twist!
- Make sure the nut mixture is evenly distributed for a consistent flavor in every bite.
Step 4: Bake the Cheesecake
Now, pour the cheesecake filling over the nut layer, smoothing it out with a spatula. Tap the springform pan gently on the counter to release any air bubbles. Place the cheesecake in the middle rack of your preheated oven and bake for about 45 minutes, or until the top is just golden. Once done, turn off the oven and let the cheesecake sit inside for another 50 minutes. This gentle cooling helps prevent cracks!
Tips for Step 4
- Keep an eye on the cheesecake; every oven is different, and you want it just set, not overcooked.
- Using a water bath can help create a moist environment, reducing the chance of cracks.
Step 5: Drizzle with Honey Syrup
After your cheesecake has cooled completely, it’s time to add the finishing touches! In a small bowl, mix together the honey, lemon juice, and a splash of rosewater. Pour this luscious syrup over the surface of the cheesecake, allowing it to soak in. Finally, sprinkle the chopped pistachios on top for that extra crunch and color.
Tips for Step 5
- For a more intense flavor, let the honey syrup sit for a few minutes before drizzling.
- Don’t be shy with the pistachios; they add a beautiful pop of color and texture!
And there you have it! Your Baklava Cheesecake is ready to be enjoyed. I can already picture the smiles on everyone’s faces as they take their first bite. Let’s move on to the next section where we’ll discuss the equipment needed for this delightful recipe!
Equipment Needed for Baklava Cheesecake Recipe

Before we dive into the kitchen, let’s make sure we have all the necessary tools at our fingertips. Having the right equipment can make the process smoother and more enjoyable. Here’s what you’ll need for this Baklava Cheesecake Recipe:
- Springform Pan: This is essential for easy removal of the cheesecake. If you don’t have one, a regular round cake pan will work, but be careful when serving.
- Parchment Paper: Lining the base of your springform pan with parchment paper helps prevent sticking. You can also use aluminum foil if you’re in a pinch.
- Food Processor: This handy tool is perfect for chopping nuts and mixing the nut layer. If you don’t have one, a good knife and cutting board will do the trick, but it may take a bit longer.
- Mixing Bowls: You’ll need a couple of these for mixing the cheesecake filling and the honey syrup. I recommend using glass or stainless steel for easy cleaning.
- Hand Mixer or Stand Mixer: A hand mixer is great for whipping the cheesecake filling, but a stand mixer can save you some elbow grease. If you don’t have either, a whisk and some muscle will work too!
- Spatula: A rubber spatula is perfect for scraping down the sides of your mixing bowl and smoothing out the cheesecake filling.
- Measuring Cups and Spoons: Accurate measurements are key in baking, so make sure you have these on hand.
- Cooling Rack: This is optional, but it helps the cheesecake cool evenly after baking.
With these tools ready, you’re all set to create your Baklava Cheesecake masterpiece! I can already feel the excitement building as we prepare to bring this delicious dessert to life. Let’s keep the momentum going and explore some variations of this delightful recipe!
Variations of Baklava Cheesecake Recipe
As a passionate home cook, I love to experiment with flavors and textures. This Baklava Cheesecake Recipe is incredibly versatile, allowing you to put your own spin on it! Here are a few variations that I’ve tried and absolutely adored:
- Nut Mix Variation: While walnuts and almonds are traditional, feel free to mix in pecans or hazelnuts for a different flavor profile. Each nut brings its own unique taste and crunch!
- Spiced Cheesecake: Add a pinch of nutmeg or cardamom to the cheesecake filling for an aromatic twist. These spices can elevate the flavor and give it a warm, cozy feel.
- Fruit Infusion: Incorporate fresh fruits like raspberries or strawberries into the cheesecake filling. The tartness of the fruit pairs beautifully with the sweetness of the honey syrup.
- Chocolate Drizzle: For chocolate lovers, drizzle some melted dark chocolate over the top before serving. It adds a rich layer of flavor that complements the cheesecake perfectly.
- Vegan Option: Substitute cream cheese with a vegan cream cheese alternative and use flax eggs instead of regular eggs. This way, you can enjoy a plant-based version of this delightful dessert!
These variations not only keep things exciting but also allow you to cater to different tastes and dietary preferences. I encourage you to get creative and make this Baklava Cheesecake your own. After all, cooking is all about expressing yourself and having fun in the kitchen!
Cooking Notes for Baklava Cheesecake Recipe
As I’ve learned through my culinary adventures, a few cooking notes can make all the difference in achieving the perfect Baklava Cheesecake. Here are some tips that I always keep in mind when preparing this delightful dessert:
- Room Temperature Ingredients: Ensure that your cream cheese, eggs, and Greek yogurt are at room temperature. This helps create a smooth and creamy filling without lumps.
- Don’t Overmix: When adding the eggs to the cheesecake filling, mix just until combined. Overmixing can lead to a dense texture, which we want to avoid!
- Cooling Time: Allow the cheesecake to cool completely in the oven after baking. This gentle cooling helps prevent cracks and ensures a creamy texture.
- Storage: If you have leftovers (which is rare!), store the cheesecake in the fridge for up to four days. Just make sure to cover it well to keep it fresh.
- Serving Temperature: This cheesecake is delicious served at room temperature, but I also enjoy it chilled. It’s all about personal preference!
These cooking notes are like little nuggets of wisdom that I’ve gathered over time. They help me create a Baklava Cheesecake that’s not only beautiful but also bursting with flavor. Now that we have these tips in our back pocket, let’s move on to serving suggestions for this delightful dessert!
Serving Suggestions for Baklava Cheesecake Recipe

When it comes to serving my Baklava Cheesecake, I love to make it a special occasion! Presentation is key, and there are a few delightful ways to elevate this dessert experience. Here are some of my favorite serving suggestions:
- Garnish with Fresh Fruits: A handful of fresh berries, like raspberries or strawberries, adds a pop of color and a refreshing contrast to the rich cheesecake.
- Pair with Whipped Cream: A dollop of lightly sweetened whipped cream on the side complements the cheesecake beautifully, adding a light and airy texture.
- Serve with a Cup of Tea or Coffee: This cheesecake pairs wonderfully with a warm cup of tea or coffee. The flavors meld together, creating a cozy dessert experience.
- Drizzle Extra Honey: For those with a sweet tooth, a drizzle of honey over each slice before serving enhances the baklava flavor and adds a touch of elegance.
- Chill and Serve: If you prefer a chilled dessert, pop the cheesecake in the fridge for a couple of hours before serving. It’s refreshing and perfect for warm days!
These serving suggestions not only enhance the visual appeal but also create a memorable experience for your guests. I can already imagine the smiles and compliments as everyone enjoys a slice of this heavenly Baklava Cheesecake. Now, let’s move on to some tips for perfecting this delightful recipe!
Tips for Perfecting Baklava Cheesecake Recipe
As I’ve journeyed through the world of baking, I’ve gathered a treasure trove of tips that can elevate your Baklava Cheesecake to new heights. Here are some of my favorite nuggets of wisdom to ensure your dessert turns out perfectly every time:
- Use Quality Ingredients: The better the ingredients, the better the cheesecake! Opt for high-quality cream cheese and fresh nuts for the best flavor.
- Chill Your Tools: If you’re using a stand mixer, chill the bowl and beaters beforehand. This helps the cream cheese whip up even fluffier!
- Check for Doneness: The cheesecake should be set around the edges but slightly jiggly in the center. It will firm up as it cools.
- Let It Rest: After baking, let the cheesecake rest in the oven with the door ajar. This gradual cooling helps prevent cracks.
- Experiment with Flavors: Don’t hesitate to add your favorite spices or extracts to the filling. A hint of cardamom or almond extract can add a delightful twist!
These tips are like little secret ingredients that can make a big difference in your Baklava Cheesecake. I can’t wait for you to try them out and see how they transform your dessert into something truly special. Now, let’s break down the time it takes to create this delicious masterpiece!
Breakdown of Time for Baklava Cheesecake Recipe
As a passionate home cook, I know that time management is key in the kitchen. When it comes to making this Baklava Cheesecake, it’s important to plan ahead. Here’s a quick breakdown of the time you’ll need to create this delightful dessert:
- Prep Time: Approximately 30 minutes. This includes gathering your ingredients, preparing the crust, and mixing the cheesecake filling.
- Cooking Time: About 1 hour and 35 minutes. This consists of baking the crust and cheesecake, plus the additional cooling time in the oven.
- Total Time: Roughly 2 hours and 5 minutes. This is the total time from start to finish, including prep and cooking.
Keep in mind that while the active cooking time is relatively short, the cooling period is essential for achieving that perfect texture. I always find it helpful to prepare this cheesecake when I have a bit of time to spare, allowing me to enjoy the process without feeling rushed. Now that we have the timing down, let’s move on to the nutritional information for this scrumptious Baklava Cheesecake!
Nutritional Information for Baklava Cheesecake Recipe
As a passionate home cook, I believe it’s important to be mindful of what we’re putting into our bodies, even when indulging in a delicious dessert like Baklava Cheesecake. Here’s a general breakdown of the nutritional information per slice (assuming the cheesecake is cut into 12 slices):
- Calories: Approximately 350 calories
- Protein: 6g
- Fat: 22g
- Carbohydrates: 30g
- Sugar: 18g
- Fiber: 1g
Keep in mind that these values can vary based on the specific ingredients you use and portion sizes. While this Baklava Cheesecake is certainly a treat, it’s also packed with wholesome ingredients like nuts and Greek yogurt, which provide some nutritional benefits. I always enjoy savoring a slice while appreciating the flavors and textures, knowing that I’ve created something special in my kitchen. Now that we’ve covered the nutritional aspect, let’s move on to some frequently asked questions about this delightful recipe!
Frequently Asked Questions about Baklava Cheesecake Recipe
As I’ve shared my Baklava Cheesecake Recipe with friends and family, I’ve encountered a few common questions that pop up time and again. I love addressing these queries because it helps everyone feel more confident in their baking journey. Here are some of the most frequently asked questions about this delightful dessert:
Can I make Baklava Cheesecake ahead of time?
Absolutely! In fact, I often make it a day in advance. The flavors meld beautifully overnight, making it even more delicious. Just be sure to store it in the fridge, covered well to keep it fresh.
Can I freeze Baklava Cheesecake?
Yes, you can freeze it! I recommend wrapping individual slices in plastic wrap and then placing them in an airtight container. When you’re ready to enjoy a slice, simply thaw it in the fridge overnight. It’s a great way to have a sweet treat on hand!
What can I substitute for cream cheese?
If you’re looking for a lighter option, you can use ricotta cheese or a vegan cream cheese alternative. Just keep in mind that the texture and flavor may vary slightly, but it will still be delicious!
How do I know when the cheesecake is done baking?
The cheesecake should be set around the edges but still slightly jiggly in the center. It will firm up as it cools. If you’re unsure, a toothpick inserted in the center should come out mostly clean.
Can I use different nuts for the topping?
Definitely! I love experimenting with different nuts. Pecans, hazelnuts, or even macadamia nuts can add a unique twist to the flavor and texture of your Baklava Cheesecake. Just make sure they’re roasted for the best taste!
Is there a way to make this recipe gluten-free?
Yes! You can use gluten-free phyllo pastry, which is available at many grocery stores. Just check the packaging to ensure it’s certified gluten-free. The rest of the ingredients are naturally gluten-free, so you’re good to go!
These FAQs are just a few of the questions I’ve encountered while sharing my Baklava Cheesecake Recipe. I hope they help clarify any doubts you may have and inspire you to dive into this delicious baking adventure. Now, let’s wrap things up with a conclusion that highlights the appeal of this delightful dessert!
Conclusion on Baklava Cheesecake Recipe
As I reflect on my journey of creating this Baklava Cheesecake Recipe, I can’t help but feel a sense of joy and accomplishment. This dessert is more than just a sweet treat; it’s a beautiful fusion of cultures and flavors that brings people together. The crispy phyllo crust, creamy cheesecake filling, and the sweet honey syrup topped with crunchy pistachios create a symphony of textures and tastes that dance on your palate.
What I love most about this recipe is its versatility. Whether you’re hosting a dinner party, celebrating a special occasion, or simply indulging in a well-deserved treat, this Baklava Cheesecake is sure to impress. It’s a dessert that sparks conversation and creates lasting memories, just like the ones I cherish from my own kitchen adventures.
So, I encourage you to roll up your sleeves and give this delightful recipe a try. Embrace the process, enjoy the aromas wafting through your kitchen, and savor each bite of this heavenly creation. I promise, once you experience the magic of Baklava Cheesecake, it will become a cherished favorite in your home as it has in mine!