
Introduction to Sugar Free Berry Chia Jam
Welcome, friends! If you’re looking for a delightful treat that’s both healthy and quick, then this Sugar Free Berry Chia Jam is just for you. I often find myself in a rush, juggling family, work, and life’s little surprises. This jam is a life-saver on those hectic mornings or as a sweet ending to a long day. Picture spreading this vibrant jam on warm toast or swirling it into yogurt. With just a handful of ingredients and minimal time, it’s a delicious way to indulge without the guilt.
Why You’ll Love This Sugar Free Berry Chia Jam
This Sugar Free Berry Chia Jam is a true gem in my kitchen! It comes together in no time, making it ideal for busy moms or professionals like us. Not only does it taste incredible, but it’s also a healthier alternative to traditional jams. You’ll love the fresh burst of berry flavor, and with the perfect balance of sweetness, it’s a treat the whole family will enjoy!
Ingredients for Sugar Free Berry Chia Jam
Let’s gather our ingredients to whip up this luscious Sugar Free Berry Chia Jam! Here’s what you’ll need:
- Mixed berries: You can use strawberries, blueberries, raspberries, or blackberries. Fresh or frozen work beautifully. They provide that vibrant flavor and lovely color.
- Chia seeds: These little powerhouses are essential for thickening the jam. Not only do they absorb liquid, creating a gel-like consistency, but they add a healthy boost of fiber, too!
- Lemon juice: A touch of acidity balances the sweetness of the berries. Fresh squeezed adds a refreshing zing.
- Honey or maple syrup (optional): Depending on your sweetness preference, these natural sweeteners can enhance the flavor. Adjust according to taste.
- Vanilla extract (optional): This adds a delightful warmth to your jam. I love it for that little extra something!
Remember, the exact measurements for these ingredients can be found at the bottom of the article for easy printing. Enjoy the creativity of tweaking the flavors based on what you have at home!
How to Make Sugar Free Berry Chia Jam

Now, let’s dive into the exciting part—making our Sugar Free Berry Chia Jam! It’s easier than you think. I’ll guide you through each step, sharing tips along the way to ensure your jam turns out superb.
Step 1: Combine Berries and Lemon Juice
Start by placing your mixed berries in a small saucepan along with the lemon juice. Over medium heat, cook them for about 5-7 minutes. You want the berries to soften and release their juices. Watch as they transform from whole fruits into a lovely berry sauce, a sight that always makes my heart flutter!
Step 2: Mash the Berries
Once the berries are cooked, take them off the heat. Now, it’s time to mash them! Using a fork or a potato masher, gently press the berries to your desired consistency. Whether you want it smooth or a bit chunky is completely up to you. Personally, I enjoy a mix of both for that delightful texture!
Step 3: Add Chia Seeds and Sweetener
Let’s jazz things up! Stir in the chia seeds and your chosen sweetener, if you’re using one. The chia seeds are magical—they’ll soak up the berry juices and help the jam thicken beautifully. I always tell my friends that adding chia is like inviting a superfood to the party!
Step 4: Rest and Thicken
Patience is key here. Allow the mixture to sit for about 10-15 minutes. During this time, the chia seeds work their magic, absorbing moisture and thickening your jam. Trust me; it’s so worth the wait! You’ll see how it transforms into a luscious spread.
Step 5: Store the Jam
Once your jam has reached the perfect consistency, it’s time to store it. Carefully transfer the jam into a clean jar or container. I always opt for glass jars—they keep everything fresh with style! Remember to store it in the refrigerator, where it will stay delicious for up to two weeks. Talk about a perfect, guilt-free treat!
Tips for Success
- Choose ripe berries for the best flavor. They make all the difference!
- For a smoother jam, blend the cooked berries in a blender before mashing.
- Experiment with different berry combinations to find your favorite mix!
- Store your jam in an airtight container to maintain freshness.
- Don’t skip the resting period; it’s essential for thickening!
Equipment Needed
- Small saucepan: A non-stick pan works best for easy cleanup.
- Fork or potato masher: You can also use an immersion blender for a smoother texture.
- Measuring cups: Essential for accuracy, though guesswork can be fun.
- Glass jar or container: Perfect for storing your jam; plastic will do in a pinch!
Variations of Sugar Free Berry Chia Jam
- Berry blend: Mix different berries for a unique flavor—try blackberries with blueberries for a delightful twist.
- Citrus zing: Add orange or lime juice instead of lemon for a refreshing citrus flair.
- Herbal touch: Infuse your jam with fresh mint or basil for an unexpected herbal note that brightens each bite.
- Spiced delight: Sprinkle in a little cinnamon or ginger powder for a warm, cozy flavor.
- Chia boost: For an extra health kick, substitute some chia seeds with ground flaxseeds.
Serving Suggestions for Sugar Free Berry Chia Jam
- Spread on whole grain toast for a hearty breakfast.
- Swirl it into oatmeal or yogurt for added flavor and nutrition.
- Use as a topping for pancakes or waffles—pure bliss!
- Fill crepes or pastries for an elegant dessert.
- Pair with cheese on a charcuterie board for a sweet contrast.
FAQs about Sugar Free Berry Chia Jam
Curious about making this delightful Sugar Free Berry Chia Jam? Here are some frequently asked questions to help you navigate your jam-making journey:
Can I use frozen berries for this jam?
Absolutely! Frozen berries are a fantastic option. They’re just as nutritious and can save you prep time. Just remember to thaw them and drain any excess liquid before cooking.
How long does this jam last in the fridge?
This Sugar Free Berry Chia Jam can last up to two weeks when stored in an airtight container. Enjoy it while it’s fresh, but I bet it won’t last that long!
What can I substitute for chia seeds?
If you don’t have chia seeds on hand, you can use ground flaxseeds as an alternative. However, keep in mind that the texture may differ slightly.
Is this jam vegan-friendly?
You bet it is! This jam is entirely vegan, especially if you opt for maple syrup instead of honey. It’s a perfect choice for plant-based diets.
Can I adjust the sweetness of the jam?
Definitely! The beauty of this jam is its flexibility. Taste it as you mix and add honey or maple syrup to suit your preference. You’re in charge of your flavor adventure!
Final Thoughts on Making Sugar Free Berry Chia Jam
Making Sugar Free Berry Chia Jam is not just about spreading joy on toast; it’s a small triumph in our busy lives. The vibrant colors and luscious flavors can brighten your mornings and satisfy those sweet cravings without the guilt. I love how easy and quick it is to whip up this jam, yet it brings such satisfaction to the table. Each jar is filled with fresh, healthy ingredients and love. It’s a little piece of happiness that you can customize, making it a perfect fit for your family’s preferences. Enjoy creating and sharing the delightful experience!
Print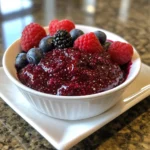
Sugar Free Berry Chia Jam
- Total Time: 15 minutes
- Yield: 8 servings 1x
- Diet: Vegan
Description
A delicious and healthy sugar-free jam made from mixed berries and chia seeds, perfect for spreading on toast or adding to desserts.
Ingredients
- 1 cup mixed berries (strawberries, blueberries, raspberries, or blackberries)
- 2 tablespoons chia seeds
- 1 tablespoon lemon juice
- 1–2 tablespoons honey or maple syrup (optional, adjust to taste)
- 1/4 teaspoon vanilla extract (optional)
Instructions
- In a small saucepan over medium heat, combine the mixed berries and lemon juice. Cook for about 5-7 minutes, stirring occasionally, until the berries have softened and released their juices.
- Remove the saucepan from the heat and use a fork or a potato masher to mash the berries to your desired consistency (smooth or chunky).
- Stir in the chia seeds and optional sweetener (honey or maple syrup), if using, along with the vanilla extract until well combined.
- Let the mixture sit for about 10-15 minutes. The chia seeds will absorb the liquid and thicken the jam as it cools.
- Once the jam has thickened, transfer it to a clean jar or container. Store in the refrigerator for up to two weeks.
Notes
- Adjust the sweetness according to your taste preference.
- This jam can be used as a topping for yogurt, pancakes, or desserts.
- Ensure the jam is stored in an airtight container in the refrigerator for freshness.
- Prep Time: 5 minutes
- Cook Time: 10 minutes
- Category: Condiments
- Method: Stovetop
- Cuisine: American
Nutrition
- Serving Size: 1 serving
- Calories: 60 kcal
- Sugar: 0g
- Sodium: 0mg
- Fat: 2g
- Saturated Fat: 0g
- Unsaturated Fat: 0g
- Trans Fat: 0g
- Carbohydrates: 10g
- Fiber: 4g
- Protein: 1g
- Cholesterol: 0mg