Introduction to Cream Puff Cake
Welcome to the delightful world of Cream Puff Cake! If you’re like me, juggling a busy schedule while trying to whip up something special for your loved ones can feel overwhelming. This dessert is a quick solution for those hectic days when you want to impress without spending hours in the kitchen. Imagine a light, airy pastry filled with creamy goodness, topped with whipped cream and a drizzle of chocolate syrup. It’s a treat that brings smiles and sweet memories, making it perfect for family gatherings or a cozy night in. Let’s dive into this easy recipe!
Why You’ll Love This Cream Puff Cake
This Cream Puff Cake is a game-changer for busy moms and professionals alike. It’s incredibly easy to make, requiring just a handful of ingredients and minimal prep time. The taste? Oh, it’s a heavenly blend of creamy and crunchy that will have everyone asking for seconds. Plus, it’s a versatile dessert that can be dressed up for special occasions or enjoyed on a quiet evening at home. You’ll love how it brings joy to any table!
Ingredients for Cream Puff Cake

Gathering the right ingredients is the first step to creating this delightful Cream Puff Cake. Here’s what you’ll need:
- Water: The base for your dough, it helps create that perfect puff.
- Salt: Just a pinch enhances the flavors and balances the sweetness.
- Butter: Adds richness and helps achieve that flaky texture.
- All-purpose flour: The backbone of the pastry, giving it structure.
- Eggs: These are essential for binding and creating a light, airy texture.
- Instant vanilla pudding: This is the secret to a creamy, luscious filling.
- Cream cheese: Adds a rich, tangy flavor to the filling; make sure it’s very soft for easy mixing.
- Milk: Used to prepare the pudding, it adds creaminess to the filling.
- Whipped topping: This lightens up the dessert and adds a fluffy finish.
- Chocolate syrup: A sweet drizzle on top that makes everything better!
For those looking to customize, consider adding a splash of vanilla extract to the filling for extra flavor or using a different type of pudding, like chocolate or butterscotch. You can find the exact quantities for each ingredient at the bottom of the article, ready for printing!
How to Make Cream Puff Cake
Step 1: Preheat and Prepare
First things first, preheat your oven to 450°F. While it warms up, grab a 9×13″ baking pan and grease it well. This will ensure your Cream Puff Cake comes out easily after baking. Trust me, you don’t want to wrestle with a stuck cake!
Step 2: Boil and Mix
In a saucepan, bring water, butter, and salt to a boil. Once it’s bubbling, remove it from the heat and pour it into a mixing bowl. Now, add the all-purpose flour and mix until it forms a ball. This dough is the foundation of your delightful dessert!
Step 3: Cool and Beat
Let the dough cool for about 10 minutes. This step is crucial! After it cools, add the eggs one at a time, beating until the mixture is thick and smooth. The dough should have a lovely satin sheen, which means you’re on the right track!
Step 4: Bake the Dough
Transfer the dough into your greased pan, pressing it out until it’s flat. Bake it in the preheated oven for 15 minutes. After that, prick the center with a knife about 15 times to let the steam escape. Lower the heat to 350°F and bake for another 20 minutes.
Step 5: Prepare the Cream Filling
While the dough cools, it’s time to whip up the filling! In a mixing bowl, beat the softened cream cheese until smooth. Then, whisk together the instant vanilla pudding and milk. Combine this mixture with the cream cheese, mixing slowly at first, then beat well until creamy.
Step 6: Assemble the Cake
Once the baked dough has cooled for about 30-45 minutes, pour the creamy filling over it. Spread it evenly, then cover with whipped topping. Finally, drizzle chocolate syrup on top for that extra touch of sweetness. Your Cream Puff Cake is now ready to chill!
Tips for Success
- Make sure your cream cheese is very soft; it blends better for a smooth filling.
- Let the baked dough cool completely before adding the filling to avoid melting.
- For a richer flavor, consider adding a splash of vanilla extract to the filling.
- Chill the assembled cake for at least an hour before serving for the best texture.
- Use a serrated knife to slice the cake for clean, beautiful pieces.
Equipment Needed
- Baking pan: A 9×13″ pan is ideal, but you can use any similar-sized dish.
- Mixing bowls: A large bowl for the dough and a medium bowl for the filling.
- Electric mixer: Handy for beating the dough and filling, but a whisk works too.
- Spatula: Perfect for spreading the filling and whipped topping evenly.
Variations
- Chocolate Cream Puff Cake: Swap the vanilla pudding for chocolate pudding for a rich twist.
- Fruit-Infused Delight: Add fresh berries or sliced bananas to the cream filling for a fruity burst.
- Gluten-Free Option: Use a gluten-free all-purpose flour blend to make this dessert suitable for gluten-sensitive friends.
- Nutty Flavor: Incorporate finely chopped nuts, like almonds or hazelnuts, into the cream filling for added texture.
- Vegan Version: Substitute eggs with flaxseed meal and use plant-based cream cheese and whipped topping for a vegan-friendly treat.
Serving Suggestions
- Pair your Cream Puff Cake with a scoop of vanilla ice cream for a delightful contrast.
- Serve alongside fresh fruit, like strawberries or raspberries, to add a pop of color.
- For drinks, consider a light herbal tea or a refreshing lemonade.
- Garnish with mint leaves for an elegant touch.
FAQs about Cream Puff Cake
Can I make Cream Puff Cake ahead of time?
Absolutely! You can prepare the cake a day in advance. Just assemble it and store it in the refrigerator. This allows the flavors to meld beautifully, making it even more delicious!
What can I substitute for cream cheese?
If you’re looking for a lighter option, you can use Greek yogurt or mascarpone cheese. Both will give you a creamy texture without compromising flavor.
How do I store leftover Cream Puff Cake?
Store any leftovers in an airtight container in the refrigerator. It’s best enjoyed within 2-3 days, but I doubt it will last that long!
Can I freeze Cream Puff Cake?
While the baked dough can be frozen, the cream filling doesn’t freeze well. I recommend freezing the dough separately and assembling the cake fresh when you’re ready to enjoy it.
What’s the best way to serve Cream Puff Cake?
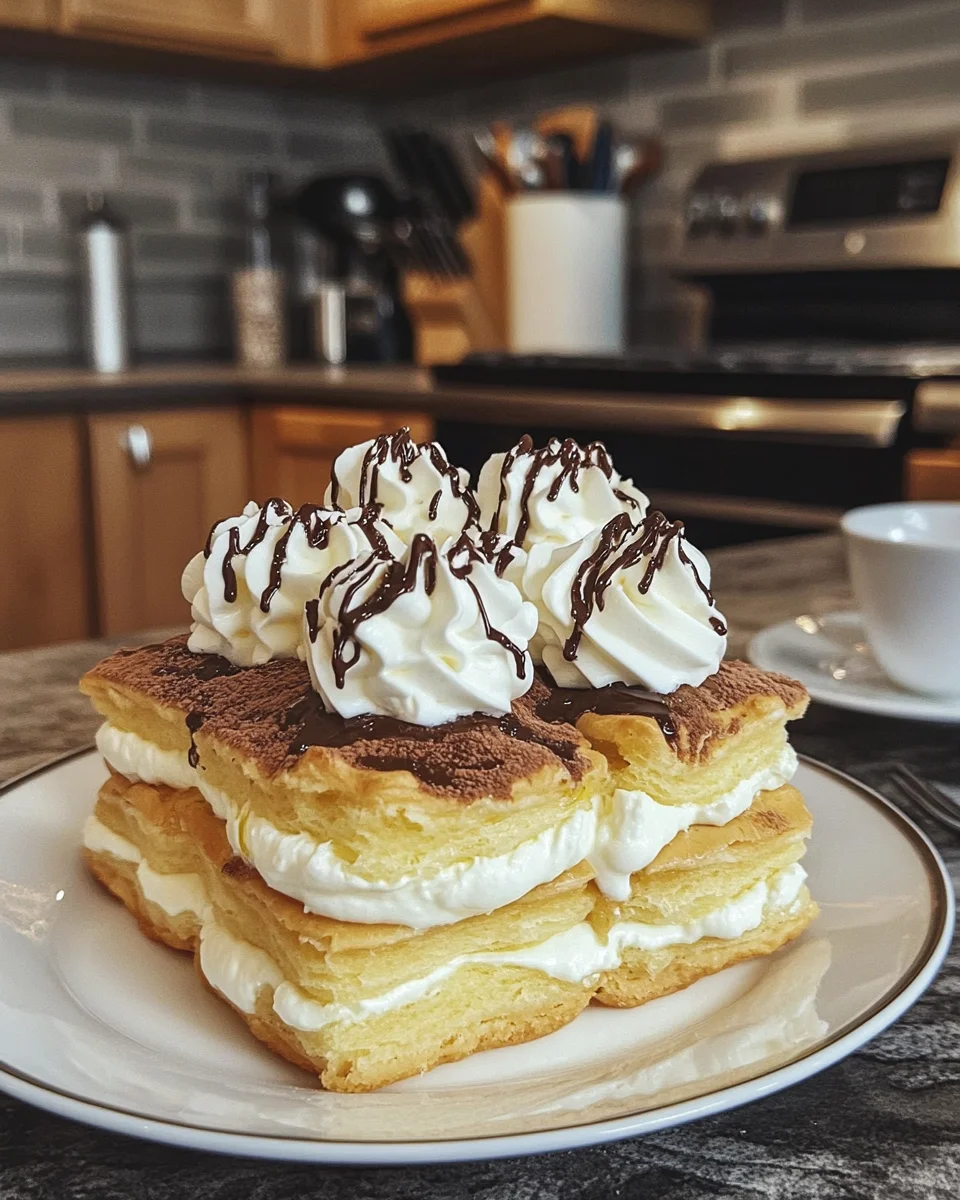
For a stunning presentation, slice the cake into squares and serve on a beautiful platter. A drizzle of chocolate syrup and a sprinkle of powdered sugar can elevate its appearance even more!
Final Thoughts
Making Cream Puff Cake is more than just baking; it’s about creating sweet moments with those you love. The joy of watching your family’s faces light up as they take their first bite is priceless. This dessert is a delightful blend of textures and flavors, making it a crowd-pleaser for any occasion. Plus, it’s simple enough to whip up even on the busiest days. So, whether you’re celebrating a special event or just treating yourself, this Cream Puff Cake is sure to bring happiness to your table. Enjoy every delicious slice!
Print
Cream Puff Cake
- Total Time: 1 hour 5 minutes
- Yield: 12 servings 1x
- Diet: Vegetarian
Description
Cream Puff Cake is a delightful dessert that combines a light and airy pastry with a creamy filling, topped with whipped cream and chocolate syrup.
Ingredients
- 1 cup water
- 1/4 teaspoon salt
- 1/2 cup butter
- 1 cup all-purpose flour
- 4 eggs
- 2 (3.9 oz) boxes instant vanilla pudding
- 8 ounces cream cheese, very soft
- 3 1/2 cups milk
- 8 ounces whipped topping, defrosted
- 1/4 cup chocolate syrup
Instructions
- Preheat oven to 450°F and grease a 9×13″ baking pan.
- Boil together water, butter, and salt. Remove from heat and pour into a mixing bowl.
- Add flour and beat by hand until it forms a ball or beat for a couple of minutes with an electric mixer until very well mixed.
- Cool dough for 10 minutes.
- Add eggs to dough and beat until thick and smooth. Dough surface should have a satin sheen.
- Cool again for about 5 minutes.
- Transfer into a greased pan and press out until flat. Bake for 15 minutes at 450°F.
- Prick with a knife about 15 times in the center that is puffed up to allow air to escape. Reduce oven heat to 350°F and bake another 20 minutes.
- Allow pan and dough to cool for about 30 – 45 minutes before adding cream filling.
- Beat softened cream cheese in a mixing bowl.
- Whisk together pudding and milk. Mix well. Add to cream cheese and mix slowly at first and then beat well. Pour over baked cream puff.
- Cover with Cool Whip and drizzle with chocolate syrup. Store in the refrigerator.
Notes
- Ensure the cream cheese is very soft for easy mixing.
- Let the cake cool completely before adding the filling to prevent it from melting.
- This dessert is best served chilled.
- Prep Time: 30 minutes
- Cook Time: 35 minutes
- Category: Dessert
- Method: Baking
- Cuisine: American
Nutrition
- Serving Size: 1 slice
- Calories: 350
- Sugar: 20g
- Sodium: 200mg
- Fat: 20g
- Saturated Fat: 10g
- Unsaturated Fat: 5g
- Trans Fat: 0g
- Carbohydrates: 30g
- Fiber: 1g
- Protein: 5g
- Cholesterol: 50mg
Keywords: Cream Puff Cake, dessert, easy recipe, vanilla pudding, whipped cream